
Dopo questo lungo percorso che abbiamo fatto nel mondo birrario, dalle origini ai giorni nostri, credo sia giunto il momento di parlare della produzione.Poniamoci subito una domanda, cos’è la birra: “ E’ la bevanda moderatamente alcolica più consumata al mondo, è il prodotto ottenuto dalla fermentazione alcolica di mosti preparati con malto d’orzo ed acqua, amaricati con luppolo… Questa semplice definizione racchiude un’infinità di cose andremo ad affrontare una per una, con la massima semplicità, allo scopo di far comprendere anche a chi ne sa poco, il procedimento per produrre una buona birra. Prima di addentrarci nel percorso ritengo doveroso precisare che il processo produttivo è sostanzialmente lo stesso, sia per la grande produzione industriale, sia per i micro birrifici che operano in tutto il mondo, sia per gli “homebrewer” o birrai casalinghi come me che si auto producono la birra per l’uso e il consumo casalingo. Ovviamente cambiano le strutture e le attrezzature e anche le tecnologie che, nel caso di grandi e grandissime produzioni, hanno lo scopo di uniformare, standardizzare e rendere costante il prodotto finale. Voglio parlare di un hobby, l’homebrewing, relativamente giovane, almeno da noi perché in Italia farsi la birra in casa, per uso personale è legale solo dal 1995. Prima erano solo pochissimi che, nella clandestinità come carbonari, osavano birrificare. Poi, nuove leggi e l’avvento di internet, hanno fatto in modo che aumentassero le conoscenze per dare il via ad un hobby che necessita solo di un modesto investimento economico, un paio di pentoloni, mastelli, mestoli, un fermentatore e poco più, insieme ad un po’ di inventiva e lo spazio di una cucina….. moglie permettendo! Lungi da me l’intenzione di insegnare, poiché sono un birraio tra gli ultimi arrivati ma voglio solo semplicemente mettere a disposizione di chiunque ne sia interessato la mia modestissima esperienza che ho maturato nel corso degli anni, anche grazie ad amici che mi hanno abbondantemente aiutato quando ero alle prime armi e spesso mi ingarbugliavo in problemi che adesso mi farebbero sorridere. Ma adesso parliamo di birra cominciando a conoscere gli ingredienti e come si fa.
LE MATERIE PRIME
Sono prevalentemente quattro, l’ orzo e altri cereali maltati, il luppolo, il lievito e l’acqua.

I CEREALI: il principale è l’orzo ma si possono usare in minori quantità anche il frumento, la segale, l’avena, il farro, ecc. L’orzo del tipo distico (cioè con i chicci disposti sulla spiga in due file, più grossi e proteici, rispetto all’orzo polistico, più adatto all’alimentazione degli animali), in natura, è molto ricco di amido, uno zucchero complesso non fermentabile che deve subire un procedimento detto maltazione che trasforma l’amido in maltosio, cioè lo zucchero semplice tipico dei cereali, adatto alla fermentazione. Come si fa: l’orzo viene messo a macerare in acqua per almeno 48 ore ad una temperatura di 10-15°C , per cui l’umidità dei chicchi aumenta dal 14 al 45%. A questo punto il cereale viene stoccato in grandi ambienti condizionati per sei giorni alla temperatura di circa 16°C (vedi foto)
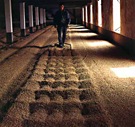


dove i chicchi, simulando le condizioni presenti in natura, iniziano a germinare emettendo una radichetta che tende ad attivare l’azione degli enzimi che prepareranno il nutrimento per la futura piantina. Ma noi li “freghiamo” perché appena la radichetta è al punto giusto si blocca la germinazione, si crea il cosiddetto malto verde che viene immediatamente portato in ambienti dove, per effetto di potenti getti d’aria calda, viene essiccato per 24 ore alla temperatura indicata per il tipo di malto che si vuole ottenere, portando l’ umidità del chicco dal 45% al 5%. I malti chiari sono essiccati a 85°C mentre per i più scuri si arriva a 100°C e per i malti speciali e altri a 140°C ,fino addirittura ai 250°C per i malti neri , questa volta in forni. E’ ovvio che questi procedimenti non li possiamo fare in casa; le malterie sono relativamente poche in tutto il mondo e producono il malto per tutti i birrifici, grandi e piccoli.
I malti base sono quattro e possono essere usati fino al 100%:

Il primo è il Pilsner: è il malto base delle birre continentali. Dà il colore più chiaro alla birra. E’ molto ricco di proteine e di enzimi. Il secondo è il Pale: simile al pilsner ma essiccato a temperatura leggermente superiore e con una maggiore germinazione, quindi più modificato, che conferisce minori quantità di proteine ma è ricchissimo di enzimi. E’ il malto delle birre d’oltremanica. Gli altri sono il Vienna e il Monaco. Sono simili al pilsner ma danno birre leggermente più scure e hanno enzimi appena sufficienti a convertire se stessi. Poi c’è il malto di frumento o Weizen, che serve per fare le weisse tedesche normalmente non viene usato oltre il 50% dato il basso contenuto di enzimi e per non causare eccessiva torbidità alla birra. Il frumento viene usato anche in forma non maltata, come nel caso del lambic e delle blanche o witbier belghe. Infine ci sono una serie piuttosto lunga di malti speciali che fanno la ricchezza degli stili, ne cito solo alcuni, come la serie Cara (caramellati), Crystal, Chocolate, Black, Roast, Sauermalz ecc. che conferiscono corpo, aromi e colore, acidità alla birra. Poveri di enzimi devono essere sempre uniti ai malti base e quasi mai utilizzati oltre il 10%. Possono essere aggiunti anche dei fiocchi di orzo, grano, avena e segale che danno oltre agli aromi anche una maggiore ritenuta di schiuma e corpo. Molti di questi, come si può capire anche dal nome, vengono miscelati al fine di ottenere le caratteristiche di colore, aroma e consistenza di un determinato stile birrario. Gli altri cereali, come il mais e il riso, sono invece meno adatti a essere maltati ma vengono comunque usati in aggiunta al malto, per aggiustarne il gusto e anche per motivi prevalente economici, dato il minore costo rispetto all’orzo. La maggior parte delle birre alla spina che abitualmente beviamo in pizzeria hanno molto spesso un colore molto chiaro e un corpo esile proprio grazie all’uso di questi ingredienti.
IL LUPPOLO (Humulus Lupulus)

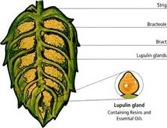
è una pianta sarmentosa rampicante della famiglia delle Cannabacee e dell’ordine delle Urticacee che da sempre cresce spontanea lungo i fiumi di tutta l’Europa, ma ormai da secoli ne sono state selezionate numerosissime varietà strettamente legate alla zona di produzione. Per la birra viene usata l’infiorescenza femminile , simile ad una piccola pigna verde. Queste infiorescenze sono ricche di ghiandole resinose secernenti una sostanza giallastra e dal sapore amaro, composta da luppolina, umulone e lupulone, da polifenoli e numerosi oli essenziali, che hanno la funzione di conferire amaro, sapore e aromi alla birra ma è importantissima anche la proprietà antiossidante di queste sostanze. L’uso del luppolo funge anche da conservante naturale della birra in quanto possiede proprietà antibatteriche, per questo motivo certi tipi di birra (per esempio la India Pale Ale) venivano abbondantemente luppolati per migliorarne la conservazione e consentirne il trasporto per nave durante i lunghi viaggi verso le colonie. Aiuta inoltre a coagulare le proteine in sospensione nella birra rendendola più limpida e migliora la ritenuta della schiuma. Le varietà sono suddivise in luppoli da amaro, da aroma o ambivalenti. Ciascuno conferisce alla birra la propria caratteristica. Il livello di amaro viene misurato in percentuale di Alfa Acidi. Ogni stile di birra utilizza i luppoli con le caratteristiche relative alla territorialità e alla tradizione. Per brevità cito i più importanti, il Saaz boemo e il bavarese Hallertau Hersbrucker, eleganti dai piacevoli toni erbacei. Gli inglesi East Kent Golding e il Challenger dagli aromi speziati e floreali, gli americani Cascade e Amarillo, molto amari e dal forte aroma agrumato e floreale.
IL LIEVITO
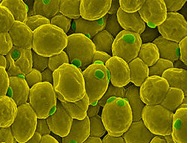

Terzo ingrediente essenziale, il lievito è ciò che serve per attivare una fermentazione ed è un organismo vivente monocellulare della famiglia dei saccaromiceti. È ciò che trasforma gli zuccheri presenti nel mosto nell’alcol della birra finita ed è quindi il responsabile del processo biochimico fermentativo. Il lievito, come ho detto nella prima puntata è stato scoperto da Pasteur nel 1876 (prima di allora tutte le fermentazioni erano spontanee), è il saccaromices cerevisiae. Questo tipo di lievito opera a temperature comprese fra i 16 e i 24°C e fermentando tende a salire in superficie. Da qui l’espressione “alta fermentazione” collegata al processo che deriva a questa famiglia di lieviti. Alla fine della fermentazione la birra ottenuta matura per un periodo di tempo di pochi giorni a una temperatura di cantina , dopodiché avrà ottenuto la stabilità che le permetterà di durare a lungo. Al termine “alta fermentazione” viene associato quello di “ale” che, sebbene indichi in modo specifico una tipologia di birre particolarmente diffusa nel Regno Unito, è al tempo stesso sinonimo di questo tipo di fermentazione. Il saccaromices uvarum ,meglio conosciuto come saccaromices carlsbergensis o a bassa fermentazione, è in grado di svolgere la fermentazione a temperature in un range tra 5 e 15°C. Questo tipo di lievito si deposita sul fondo dei tini al termine del processo (rendendo così anche più semplice la raccolta delle cellule di lievito a fermentazione finita) e da qui la definizione di “fermentazione bassa”. Questo tipo di fermentazione, storicamente legato anche all’invenzione del freddo artificiale, proprio perché si svolge a temperature più basse di quelle del saccaromices cerevisiae, consente di mantenere un maggiore controllo della flora microbiologica proteggendo così la birra da eventuali agenti esterni in grado di guastarla. Per queste e molte altre ragioni la “bassa fermentazione” conosce un enorme successo durante tutto il secolo appena concluso e si delinea come la fermentazione utilizzata dalla grande industria. Esistono poi dei lieviti, che io non amo definirli selvaggi ma in realtà lo sono, presenti nell’aria di determinate zone che consentono una fermentazione spontanea senza l’inoculazione dei lieviti selezionati. Come ho già detto, ma lo ripeto volentieri, la prova di tutto ciò è confinata in una piccola valle vicino a Bruxelles, dove un manipolo di incalliti produttori danno ancora oggi vita ad alcuni degli stili più complessi e al tempo stesso interessanti presenti nel panorama artigianale del mondo birrario, il Lambic. Inutile dire che si tratta di tecniche non applicabili all’industria e, come tali, a rischio di estinzione. Proprio perché il lievito è uno degli elementi del processo produttivo più difficili da controllare, oggi alla fermentazione spontanea è stata sostituita l’aggiunta al mosto di malto di lieviti (all’incirca 10 miliardi di cellule per ogni litro) che, nutrendosi e riproducendosi, danno vita alla fermentazione. Questo processo costituisce un momento fondamentale nella determinazione del gusto e dei profumi di una birra ed è per questo che, sebbene se ne parli poco, per i produttori è importantissimo tenere sotto controllo questa fase della lavorazione. Scrive Michael Jackson: “Per quanto riguarda i vini si può sostenere, forse un po’ semplicisticamente, che esiste una divisione centrale relativa al colore, quella tra rossi e bianchi. Per la birra tale divisione non concerne il colore ma il tipo di lievito usato”.
L’ACQUA costituisce, in percentuale, la grandissima parte di un litro di birra e non costituisce un dettaglio nella produzione. La qualità dell’acqua, la sua durezza, i contenuti minerali sono determinanti per la riuscita di una birra di qualità, un po’ come avviene per i grandi whisky. E non a caso possiamo trovare storiche fabbriche di birra proprio dove esistono importanti produzioni tessili: l’acqua priva di calcio è utile alla produzione di una buona lager così come al lavaggio delle stoffe. È il caso di Biella, città ben nota per l’industria dei tessuti ma che ha dato i natali anche alla celeberrima Birra Menabrea.

Certo, di acqua ne è passata sotto i ponti, e oggi le moderne tecnologie permettono di “aggiustare” le caratteristiche chimico-fisiche dell’acqua al fine di ottenere ciò che si desidera, anche dove naturalmente non sarebbe possibile. O perlomeno di avvicinarcisi molto. Io, nella mia rudimentale tecnica, per birrificare utilizzo l’acqua di rete, avendo in casa un addolcitore e un decloratore, che mi danno un’acqua ottima per produrre birre chiare e di media struttura mentre per fare le birre ambrate o scure, bypasso l’addolcitore e… il gioco è fatto.
COME SI FA LA BIRRA
I metodi di produzione a livello casalingo sono sostanzialmente tre: il primo è il più semplice e alla portata di tutti, ma anche il meno divertente, il “Kit” o “estratto di malto luppolato” che non è altro che un barattolo contenente un estratto già preparato industrialmente, che viene messo a bollire con una quantità prestabilita di zucchero, raffreddato e messo nel fermentatore insieme all’acqua necessaria a raggiungere la quantità stabilita, vi si inocula il lievito e a fine fermentazione si imbottiglia con un misurino di zucchero che rifermentando darà la frizzantezza alla birra. Il secondo è l’ ”estratto + grani + luppolo”. Simile al precedente ma che consente di aggiungere malti speciali e luppolare a piacere, quindi il birraio ha qualche possibilità minima di inventiva. Il terzo è il metodo “all grain” che somiglia in tutto e per tutto alla produzione di piccoli e grandi birrifici. Impegnativo e complesso, necessita di conoscenze di base su ingredienti e procedimenti, oltre ad una esperienza che però aumenta di cotta in cotta. Per ovvi motivi parlerò soltanto di produzione all grain anche perché è la tecnica che uso io ormai da molti anni.
IL MASHING O AMMOSTAMENTO.
Una volta stabilito che tipo di birra si vuole fare ( ovviamente si parte sempre da una ricetta), si assemblano i malti necessari per la tipologia e la quantità necessaria per raggiungere i gradi plato desiderati. Si inizia dalla macinazione (vedi foto)
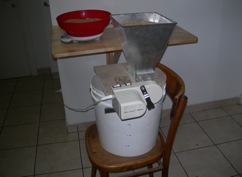
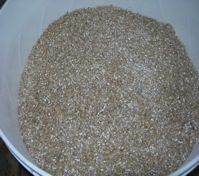
del malto che viene frantumato piuttosto grossolanamente, e nel frattempo si mette la quantità necessaria di acqua nel pentolone o tino di ammostamento, la si porta ad una temperatura di una cinquantina di gradi e vi si versa il malto macinato. Così si inizia il mashing o procedimento di saccarificazione, che consente agli enzimi di trasformare gli amidi in zuccheri più o meno fermentabili. Per ottimizzare il lavoro degli enzimi è necessario mantenere il ph dell’impasto il più vicino possibile a 5.3 o 5.5 Gli enzimi più importanti sono i “proteolitici” che rompono le catene complesse di proteine trasformandole in aminoacidi e i “diastatici” che convertono gli amidi in zuccheri fermentabili e maltodestrine meno fermentabili.
La temperatura di circa 50-52°C viene mantenuta per circa 15/30 minuti. Questa fase si chiama “PROTEIN REST” o proteasi e serve a disgregare le proteine. Poi si eleva gradualmente la temperatura fino a 62-66°c e si mantiene costante per un periodo da 45 a 60 minuti. Questa è la BETAAMILASI, che estrarrà maltosio e altri zuccheri fermentabili i quali daranno poi il grado alcolico alla birra. La fase successiva si chiama ALFAAMILASI, e consiste nell’aumentare la temperatura fino a 72°c per una ventina o più minuti. In questo step si estrarranno le maltodestrine e gli zuccheri meno fermentabili che saranno responsabili del corpo della birra. A saccarificazione avvenuta (verificata con un test con tintura di iodio), la temperatura viene ulteriormente elevata a 78°c ( MASH OUT o fine cottura) per pochi minuti per fare in modo che gli enzimi, che altrimenti continuerebbero ad agire anche nella fase successiva di filtraggio, vengano inattivati. A questi step se ne possono aggiungere altri intermedi, a discrezione del mastro birraio, tenendo presente che a temperature più basse si privilegia il tasso alcolico, mentre le più alte daranno più corpo e struttura alla birra. Questo metodo è chiamato “ad infusione” mentre l’altro, ugualmente importante e utilizzato per la maggior parte delle birre tedesche a bassa fermentazione si chiama “a decozione” e consiste, durante il mashing di prelevare una parte dell’impasto, normalmente un terzo, portarlo ad ebollizione e reimmetterlo nel tino, alzando così la temperatura. Questa operazione può essere ripetuta più volte, a seconda della ricetta. A questo punto tutti gli amidi presenti nel malto sono trasformati in zuccheri, quindi si procede alla filtrazione. Il tino, generalmente è dotato di un sistema filtrante che trattiene le trebbie e di un rubinetto, per cui il mosto viene passato, per caduta in un altro recipiente dove avverrà la bollitura. Siccome le trebbie sono ancora molto ricche di zuccheri si effettua lo SPARGING che consiste nel mettere da sopra, acqua calda a 78°c che attraverserà, lavandole, le trebbie per recuperare gli zuccheri residui. Le trebbie esauste verranno poi avviate alla trasformazione per fare un ottimo mangime per animali. Io qualche volta le ho usate in aggiunta alla farina, per fare il pane e vi assicuro con un ottimo risultato.
LA BOLLITURA
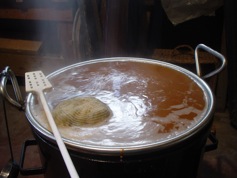
E’ una fase molto importante del processo, le sue funzioni principali sono l’estrazione delle sostanze del luppolo, la formazione dei coaguli proteici del mosto, la sterilizzazione e la concentrazione del mosto data dall’evaporazione.
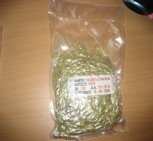
Raggiunta la giusta quantità di mosto alla densità prevista inizia la bollitura. Appena il mosto è in ebollizione si inserisce il luppolo (in sacchetti di garza detti HOP BAGS), per il quale però ci troviamo di fronte a due esigenze contrastanti. Per estrarre l’amaro dato dalle resine sono necessarie lunghe bolliture, per cui si vanno a perdere gli aromi dati dagli oli essenziali che sono estremamente volatili. Quindi il luppolo viene inserito in due o tre fasi: quello da amaro verrà inserito subito e dovrà bollire tra 60 e 90 minuti. Quando manca una mezz’ora alla fine si inserisce il secondo luppolo che darà sapore e aiuterà la coagulazione delle proteine mentre quello per gli aromi sarà immesso 5/10 minuti prima della fine della bollitura. Si può utilizzare lo anche stesso tipo di luppolo per le tre fasi ma generalmente ogni stile prevede l’utilizzo di luppoli diversi a seconda delle funzioni richieste. I grandi degustatori riescono molto spesso a riconoscere i tipi di luppolo utilizzati. Alla fine della bollitura si rende necessario separare il più possibile le parti solide come i coaguli proteici e i residui del luppolo dal mosto. A questo scopo si effettua una manovra detta “Whirlpool” che consiste nel far girare vorticosamente il mosto in modo che la forza centripeta raggruppi tutte le parti solide al centro della pentola.
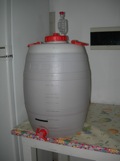
IL RAFFREDDAMENTO: è un’ operazione da fare nel minor tempo possibile perché da questo momento in poi il pericolo di infezioni che possono compromettere la buona riuscita della birra è piuttosto elevato ( può bastare un semplice starnuto a distruggere la cotta ) a causa di agenti contaminanti che possono essere presenti nell’ambiente. Si collega il rubinetto di uscita della pentola con uno scambiatore di calore ( la foto del mio, rudimentale ma efficacissimo)
 per effetto del quale il mosto entra nello stesso alla temperatura di 100°C ed immediatamente esce verso il fermentatore alla temperatura dell’ acqua di raffreddamento.
LA FERMENTAZIONE
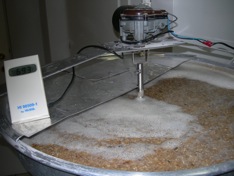
Appena tutto il mosto è dentro il fermentatore, questo deve essere ossigenato allo scopo di consentire al lievito, che inseriamo subito dopo, di iniziare la fermentazione nella maniere più veloce possibile. Il lievito, prima dell’immissione, deve essere attivato e reso pronto per l’uso. Siccome io uso sempre lieviti liquidi freschi, che sono più costosi ma di qualità nettamente superiore ( c’è un detto “ il birraio fa il mosto ma è il lievito che fa la birra), parto un paio di giorni prima con lo starter che non è altro che un letto di coltura dove le cellule si moltiplicano in modo esponenziale. Faccio una mini birra di circa un litro con dell’estratto di malto, la inserisco in una beuta su un agitatore magnetico (vedi foto)
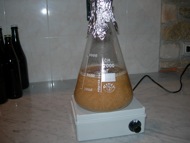

dove il lievito attende con ansia di essere immesso nel fermentatore al massimo della sua attività. La fermentazione inizia tumultuosamente dopo poche ore e gli zuccheri vengono divorati velocemente e dopo tre o quattro giorni si rende necessario travasare in un altro fermentatore per eliminare i residui proteici precipitati sul fondo. Ora la fermentazione procede più lentamente per ancora qualche giorno e appena terminata, si misura la densità e si procede all’imbottigliamento. Nel frattempo avremo inserito nella birra ( a questo punto non è più mosto ma già birra) una soluzione zuccherina necessaria per la rifermentazione in bottiglia, esattamente come la “liqueur d’ expedition” nel metodo classico. Adesso occorre aspettare con pazienza una quindicina di giorni prima di poter assaggiare il frutto di questo lavoro ma la birra sarà al top dopo un periodo di maturazione che può andare da 3 a 6 mesi a seconda dello stile e della struttura. Ovviamente se si sono rispettate tutte le norme igieniche necessarie per evitare le sempre possibili contaminazioni. Contrariamente si avranno delle poderose fontane all’atto dell’apertura della bottiglia che causeranno risate e improperi da parte degli ospiti che abbiamo inconsapevolmente invitato a cena.Tra tutte queste fasi ci sono tutta un a serie di test, misurazioni e controlli e operazioni di pulizia e sanitizzazione di contenitori, attrezzi e strumenti, mani comprese, che non ho riportato per motivi di spazio. Come si può notare da alcune immagini, la mia attrezzatura completamente auto costruita, appare rudimentale ma, vi assicuro è di grande efficacissima. Del resto il mondo dell’homebrewing è anche il mondo del fai da te. Con fornelli, pentoloni, mastelli, mestoli, e tutto il resto riesco spesso ad avere un efficienza oltre l’80% e le birre sono quasi sempre di altissima qualità…….e non sono io a dirlo!
Paolo Zaini
-Gli autori degli articoli sono responsabili in prima persona dei testi pubblicati-.Poliphenolica.com si solleva da qualsiasi responsabilità.-
Time to brew our own beer!
We are at the end of a long journey around the world of beer, from the earliest origins to nowadays; therefore I believe it’s time to learn how to brew.
First of all I wish to define what exactly is beer: it’s the most popular low-alcohol beverage in the world, obtained from the alcoholic fermentation of worts prepared with barley malt and water, and bittered with hops…Quite a simple way to describe a very complex subject. We will cover all the related issues, one by one, in the most easy way possible, with the aim to explain how to produce a nice beer, in such a way that also beginners will be able to understand. I wish to state beforehand that the brewing process is basically the same for the large industrial production, for the microbreweries at present producing all over the world, and for the home-brewers – like me – that brew for own consumption. Of course the structure, the equipments and the technologies are different. For larger productions the target is to uniform and standardize the end product.
I wish to treat this new, very trendy hobby: home-brewing, a novelty for Italy since to produce beer for personal use is legal only from 1995 on. Until then it was a clandestine affair and very few did really dare to home-brew! New laws and the internet enhanced the knowledge and have made this pleasant pastime so popular and so worldwide spread. All the equipment needed is a very cheap commitment: a couple of large pots, some tubs, some ladles, a fermenting vat and not much more, besides a bit of creativity and a kitchen at disposal…with a wife’s permission!
Far from my intention to stand as a teacher because I am a newcomer myself. I simply wish to share my experiences gathered over some years, also with the precious help of some good friends when I had to face such problems that, at present, would only bring me out a smile. But now let’s speak of beer starting from the ingredients.
INGREDIENTS
Basically the ingredients are four: barley and other malted grains, hops, yeast and water.
GRAINS
The most important and the most used grain is barley, but also wheat, rye, spelt etc. are used. The two-row barley (so called because the grains grow in a double row on the ear, are larger and contain more proteins than the four/six rows varieties, normally employed as fodder) is rather rich in starch: a complex, not fermentable sugar which must undergo the malting process so as to change into maltose, a simple, fermentable sugar, typical in grains. Barley is steeped in water for at least 48 hours at an average temperature of 10°-15°C, the moisture of the grains increases from 14% to 45%. At this point it is stored in large conditioned areas, for six days at the temperature of approx. 16°C (see picture).
The grains perceive the same conditions that occur in a natural environment, so begin to sprout and activate the action of the enzymes devoted to prepare the nourishment for the seedling. At this point the germination process is roughly stopped, and the so called green malt is produced. This is then quickly spread over the floor of special rooms and here is dried for 24 hours with powerful hot air flows at a specific temperature for each type of malt desired; the humidity is knocked down from 45% to 5%. Light malts are dried at 85°C, while the darker ones reach 100°C; special malts are kilned at 140°C up to 250°C, these latter ones are also called black malts. Of course these are not procedures which is possible to carry on at home: there are few malt houses in the world and they produce both for large and for small breweries.
The basic types of malt are four and can be used up to the 100%.
The first type is the Pilsner malt: the basis for all continental beers. It endows the lightest color to beer and is very rich in proteins and enzymes.
The second type is the Pale malt: it’s quite similar to the Pilsner, but it is dried at a somewhat higher temperature and has sprouted for a longer time; it’s more modified, not so rich in proteins but with plenty enzymes. Typical beyond the Channel.
The other types of barley malt are the Vienna and Munich. Quite similar to the Pilsner malt anyhow are used for slightly darker beers and the enzymes are just sufficient to an autonomous conversion.
Moreover there is also the Weizen, or wheat malt, employed to brew the German Weisse beers, commonly used not over the 50% because of its low contents of enzymes, and also to prevent an excessive haze. Not malted wheat is also used, e.g. for lambics and Belgian blanches or witbier. To end this matter, there are also several special malts that enrich the complexity of styles, such as the Cara (stands for caramelized) varieties e.g. Crystal, Chocolate, Black, Roast, Sauermalz etc. that confer body, aromas, color and sourness to beer. Since these special malts are poor in enzymes, they must always be coupled with basis malts and not exceed the 10% of the grain bill. Barley flakes, as well as wheat, oats and rye flakes, can also be added so bringing more aromas, a better head retention and a higher consistency and body. Said ingredients become part of the mix with the purpose to characterize the fragrance, the color and the strength and weight of each beer style.
Other grains, such as corn and rice – not suitable for the malting process – are anyhow added to the malt, sometimes for taste purposes, some other for economic reasons, being cheaper than barley. Most of the draught beers normally served in the pizza-houses are rather pale, light and poor-bodied because of the use of the just above mentioned ingredients.
HOPS (Humulus Lupulus)
Hop is a sarmentous climbing plant – botanic Family Cannabaceae, Urticales Order – which commonly grows since ages and ages along the rivers’ banks all over Europe. However from several centuries on many varieties have been specially selected in the various countries and so have achieved a close link with their origin-land. Only the female flower clusters are used for brewing purposes and they look like small green cones. Also called hops themselves, the flowers bear some tiny glands, the lupulin glands, which discharge a yellowish, bitter, resinous secretion containing lupulin, humulene, myrcene, linalool, tannins, poliphenols, resins and also many essential oils, which impart bitterness and flavor to the beer and have anti-oxydizing qualities too. Hop is also employed as a natural preservative thanks to its anti-bacterial characteristics. For this reason some types of beer, such e.g. the India Pale Ale, were strongly hopped in order to improve the preservation length so that they could be forwarded by ship to every faraway corner of the British Empire. Moreover, hops help the coagulation of proteins in suspension, thus improving the limpidity and the head retention. The varieties: bittering hops, aroma hops, dual purpose hops. Each type endows to the drink unique features. The bitter ratio is measured as percentage of alpha-acids. Every beer style uses the hops that are more typical of that country and its traditions. To be concise, I will hereby list only the most important varieties. Saaz from Bohemia, and Hallertau Hersbrucker from Bavaria, with elegant and pleasant grassy hints. East Kent Golding and Challenger from the UK, spicy and flowery and the Cascade and Amarillo, from the States, quite bitter and with a marked citrus and flowery aroma.
YEAST
The third ingredient, yeast, has the function of activating fermentation, is a unicellular living microorganism and belongs to the Saccharomycetes Family. Converts the sugars contained in the wort into the alcohol of beer, so being the responsible of the biochemical process called fermentation.
The yeast called Saccharomices Cerevisiae was discovered by L. Pasteur in 1876. The working temperature of this strain ranges between 16° to 24°C, and whilst fermenting raises upwards, to the surface of the wort. For this reason we define it a “top fermenting” or “top cropping” yeast. At the end of the fermentation process, the beer is matured for a few days at cellar temperature, so achieving the necessary stabilization that consents a longer shelf life. The word “top fermentation” is closely linked to the word “ale”: this latter term specially defines a typical beer style most popular in the UK, but is also synonym for this fermentation method. The Saccharomices Uvarum, also called Saccharomices Carlsbergensis, or “bottom fermenting” or “bottom cropping” yeast performs its activity at lower temperatures, encompassing from 5° to 15°C. At the end of the process, it drops to the bottom of the vats or tanks – this way it is also easier to gather the exhausted yeast cells – so gaining the name that defines it. This fermentation method is closely related to the invention of artificial cooling systems, due to the lower operating temperatures; it consents also a closer control of the microorganisms, thus protecting beer against possible spoilage. For this reason – and not only – the “bottom fermentation” successfully expands its acceptance from the very beginning, until becoming the most used method in the industrial production of beer, throughout all the past century to nowadays. Other yeasts are used. I don’t like very much calling them wild yeasts, even if, by all means, they really ARE wild and float in the environment of certain countries: they trigger a spontaneous fermentation therefore cultured strains are no more needed. The unquestionable proof comes from a region near Brussels, a small valley where obstinate brewers still produce an absolutely complex style, extremely interesting among craft beers, called Lambic.
No need to say that these techniques are not fit for industrial production and this fact jeopardizes their existence. Yeast is the most difficult item to keep under control along all the brewing process, for this reason at present the spontaneous fermentation is being replaced by adding yeasts to the wort (approximately 10 billion cells per liter) which feed and multiply, so starting the fermentation. This is a fundamental issue of all the process since it determines the development of beer’s tastes and aromas; for this reason – even though it’s not much treated – producers deem extremely important to control this stage of the brewing process.
Quoting Michael Jackson: “For what concerns wines, in a quite simplistic way we can state that there is a major split between red and white wines. Beers instead are not classified according to the color but to the yeast used”
WATER
A glass of beer is almost totally composed by water. This is a considerable issue. In fact the quality of water, its hardness, the minerals contained, are all fundamental and pregnant features for the final quality of beer, likewise what happens with great whiskies. In fact it is not incidental that famous breweries are located in the same areas where important textile industries too settled down: calcium free waters are an advantage both for the production of a nice lager, and to wash clothes. So happened in Biella, a town renowned for textile products but also for the historical Birra Menabrea.
Of course a lot of water has flowed under the bridges: the present-days’ technologies consent to adjust the chemical features of water in order to obtain the requested typology, or something very similar. In my personal experience, I use the mains’ water treated through a water softener and a dechlorinator to brew pale and light beers, while amber, red or dark beers are made with the water just as it springs from the tap. It works!
HOW TO BREW
Home-brewing methods are basically three.
The first one is also the easier one and is largely available to everyone, but is not so cool: it’s the “Kit” or “hopped malt extract”; nothing more than a can containing an industrially prepared mix that shall boil with a predetermined quantity of sugar, cooled down and poured inside the fermenting vat with the prescribed quantity of water; yeast is then added and at the end of the fermentation phase, it will go into the bottles adding the convenient quantity of sugar which re-ferments and so endows fizziness to beer.
The second method is the “extract + grains + hops”. Not too unlike the previous one, it consents to choose special malts and hops according to each one’s taste: the brewer so has some chances to become creative.
Finally the third one, called “all grain”, which is by all means similar to the methods used in small and large breweries. Demanding and complex, it requests a basic know-how about ingredients and procedures, besides a wide experience, gained day after day, brew after brew. Obviously I will treat only the all-grain method, since that one is what I am experiencing since several years.
MASHING
The first step is to decide what kind of beer you wish to brew. Of course the basis is always a recipe. Mix the requested malts by variety and quantity so as to obtain the target Plato degrees.
Then begin to crush malts quite roughly; in the meanwhile put the required quantity of water in a large pot or in the mashing tun and bring it to approximately 50 °C; add the crushed malt to the water. This way begins the mashing, also known as saccharification procedure, that consents to the enzymes to modify starch in more or less fermentable sugars. To optimize the task of the enzymes it is necessary to maintain the pH of the mash close to 5.3 or 5.5 values. The most important enzymes are the “proteolytics” which break the complex proteins chains and change them into amino acids, and the “diastasics” which convert starch into fermentable sugars and less fermentable maltodextrins.
The temperature of about 50° to 52°C is maintained from 15 to 30 minutes. This phase of the process is called “protein rest” (or protease, proteinase, peptidase), and is intended to break down the proteins to simpler proteins and aminoacids. The temperature then is increased to range between 62° and 66°C and so is maintained for about 45 to 60 minutes. This phase is called “Beta-amylase” and is intended to produce maltose and other fermentable sugars, which will bring alcohol strength to the beer.
The following step is called “alpha-amylase”; the temperature increases once more, up to 72°C for about 20 minutes or a little more. In this phase maltodextrines and less fermentable sugars, responsible for giving consistency and body to the beer, are produced. Once the saccharification process ends, conveniently checked by effecting the iodine test, the temperature is raised further on up to 78°C for a few minutes with the purpose to stop the enzymes’ activity; this phase is called “mash-out”. Should the enzymes not be inactivated they would continue their activity also during filtering – that represents the following step. Intermediate interventions can also be introduced, at the brewer’s choice, keeping in mind that at lower temperatures is increased the alcohol contents, while higher temperatures bring advantage to the body and the overall structure of the beer.
The described mashing system is called “infusion”. Another system, called “decoction” is used for most of the German lagers; it implies to remove some mash – approximately the third part – to boil it apart and then to return it to the left over mash so raising the overall temperature. This technique can be repeated several times, depending on the recipe. At this point all the starches have been turned into sugars, so filtering can be made.
Usually the vat is provided with a filtering system that retains the trub, and a faucet, through which the wort falls down into another container, which will be used to boil.
Turbs are still quite rich in sugars, so at this point is performed the operation called “sparging”: hot water, the temperature being 78°C , is poured over the turbs, rinsing them and therefore recovering the residual sugars.
The spent turbs will be recycled as high quality fodder. I have experimented adding them to wheat flour to dough bread: I assure you that it has yielded an excellent result.
BOILING
Boiling represents a very important step of the brewing process. The main functions are: to extract the desired substances from hops, the flocculation of proteins in the wort, the sterilization and the concentration of the wort due to the evaporation. Once obtained the selected quantity of wort at the desired gravity, start the boiling phase. As soon as the wort boils, introduce the hops, tied inside the hop bag. Two are the requirements, apparently in conflict. To extract the bitter taste from the hops’ resins we need a long boiling, but this way the aromas coming from the extremely volatile essential oils will get lost. For this reason it’s recommended to introduce the hops in two or three different moments: the bittering hop will go into the wort for first and so will boil for 60 to 90 minutes. At approximately half an hour from the end of the process put the second variety of hops, to enhance taste and the flocculation of proteins. Finally add the aroma hops almost at the end i.e. from 5 to 10 minutes before the boiling phase is terminated.
The same variety of hops can be used for all the three steps, but usually each style requests the use of different hops for each feature desired. Expert tasters often can detect the variety of hops that has been used.
At the end of the boiling it is necessary to separate as much as possible the solid parts such as the flocculated proteins and the residuals of hops, from the wort. For this reason is applied the “whirlpool” technique, that consists in whirling the wort at high speed so that the centripetal force conveys all the solid parts towards the central part of the pot.
COOLING
This step of the brewing process must be carried out as quickly as possible because from now on the hazard of infections that could affect the final result is pressingly hanging, because of polluting agents eventually floating in the environment. Connect the pot’s outlet faucet with a heat exchanger, i.e. a cooling system: the wort enters the system at 100°C and is immediately knocked down to the cooling water temperature. At this purpose, please have a look to the picture of my equipment, quite rudimental, but very effective indeed.
FERMENTATION
As soon as all the wort is in the fermenter, it is necessary to oxygenate it so as to consent to the yeast – which we are just going to add – to begin the fermentation as quickly as possible. Before adding the yeast this must be activated and prepared for use.
An old saying sentences that “It’s the brewer that makes wort but it’s yeast that makes beer”.
For this reason I use only fresh liquid yeasts, which are somewhat more expensive but perform absolutely the best results. A couple of days in advance I activate the starter, which is but a culture slant where the cells begin to multiply at a staggering speed.
Then I brew a small beer, approx. 1 liter, with some malt extract, I put it in a conical flask, and place it on a magnetic agitator, as shown in the picture; the yeast is now ready to be added to the fermenter at the climax of its activity level. A turbulent fermentation starts and in a few hours all the sugars are eagerly devoured; after three or four days it will be necessary to decant the liquid into another fermenter in order to remove the protein residues precipitated to the bottom. Now the fermentation can continue more calmly for some other days; at the end of this phase the gravity is measured and the bottling can take place.
In the meanwhile we have added to the beer – because now we are no more speaking of wort – a fermentable sugary solution, required to the bottle conditioning, just like the “liqueur d’expedition” is used to get a wine sparkling with the classic method. Now a fifteen days must elapse before tasting the product of our work, even though the beer will be at its best only after a conditioning lasting from 3 to 6 months, depending on the style and the body. Of course all the sanitary prescriptions must be strictly followed in order to prevent any possible pollution. Eventual lacks in this important issue may result into mighty fountain effects upon uncapping a bottle, with all the presumable – more or less amusing – consequences involving our kind guests and their subsequent mockeries…. Between the various steps of the brewing process a long list of tests, measurements and checks, cleaning and sanitizing operations of equipments, tools and hands too – which I have omitted for length reasons – must be scrupulously carried out.
A you will certainly gather from some of the above pictures, my brewing equipment is completely home-made, but I can assure you that, even if the appearance is quite…rudimental, it proves to be absolutely reliable and effective. By all means home brewing also implies a deep do-it-yourself know-how.
Stove, pots, vats and buckets, ladles and more are enough for me to obtain an extremely remarkable efficiency, often over 80%, and to produce a premium quality beer….so I am told!
Paolo Zaini
Translation by Mabira Piccaro


Finalmente ho capito il ciclo “vitale” della birra.
Da qui al voler provare c’è di mezzo mia moglie che non credo sia disposta a prestami gli arnesi necesari.
Un grazie infinito
Paolo
Paolo,
io ho la fortuna di avere un rustico per potermi sbizzarrire a mio piacimento, soprattutto quando mia moglie è al lavoro e quando torna ho già ripulito attrezzature e pavimento. Però conosco gente che birrifica in una normale cucina, ovviamente alzandosi presto al mattino, per fare in modo che all’ora di pranzo sia già tutto sgomberato.
Però puoi fare la birra dal kit, che è molto semplice e ti assicuro che è molto migliore di qualsiasi birra commerciale.
Ti ringrazio del commento,
paolo zaini
Impara l’arte e mettila da parte… Grazie a lei Paolo!